Heat Transfer Vinyl placement is crucial for achieving professional results. Proper positioning enhances visual appeal and ensures a balanced look. It requires understanding garment type‚ size‚ and design proportions for perfect application.
1.1 Importance of Proper Placement
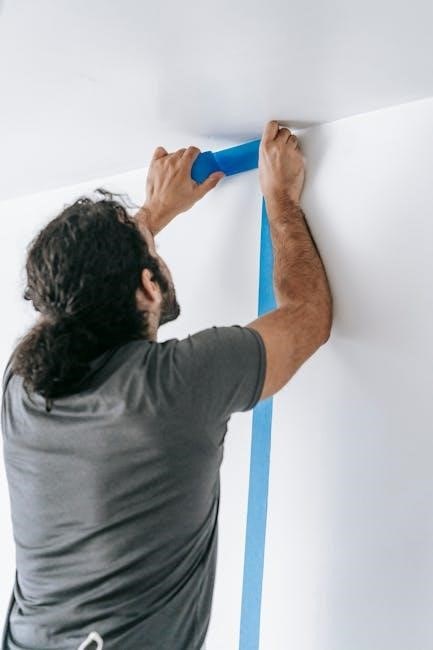
Proper HTV placement is essential for a professional and visually appealing design. A well-positioned transfer ensures the design is balanced and enhances the overall look of the garment. Incorrect placement can make the design appear off-center or awkward‚ potentially ruining the project. Placement impacts the wearer’s perception‚ with designs placed too low often looking unflattering. Properly positioned HTV designs create a polished‚ high-quality finish. Following guidelines ensures consistency‚ especially for bulk orders. Small variations in placement are less noticeable‚ but aligning designs accurately is key for a cohesive look. Understanding proper placement techniques is vital for achieving the desired aesthetic and meeting customer expectations. This guide provides clear‚ actionable advice to help you master HTV placement and elevate your projects to the next level. By focusing on precise positioning‚ you can ensure your designs look professional and eye-catching every time.
1.2 Overview of HTV Placement
HTV placement involves strategically positioning heat transfer vinyl designs on garments to achieve a professional‚ balanced look. Proper placement ensures designs are visually appealing and proportionate to the garment. This process requires understanding key placement areas‚ such as chest‚ sleeve‚ and back positions‚ as well as sizing guidelines. Tools like measuring tapes and alignment grids help in achieving accurate results. Placement varies by garment type‚ with specific rules for round-neck shirts‚ hoodies‚ and onesies. The goal is to create a seamless‚ polished finish that enhances the wearer’s appearance. This guide provides a comprehensive overview of HTV placement techniques‚ ensuring designs are centered‚ proportionate‚ and visually striking. By following these principles‚ crafters and businesses can produce high-quality‚ custom garments with ease and precision. Proper HTV placement is the foundation for creating standout designs that meet customer expectations.

Tools You Need for HTV Placement
The essential tools for HTV placement include a heat transfer vinyl cutter‚ weeding tools‚ a heat press‚ measuring tape‚ and an alignment grid to ensure precise and professional results.
2.1 Heat Transfer Vinyl Cutter
A heat transfer vinyl cutter is a vital tool for precision cutting of HTV designs. It ensures clean edges and accurate details‚ making it essential for custom designs. Available in various sizes‚ from desktop cutters for small projects to industrial cutters for large-scale production‚ these machines offer versatility. The cutter’s blade depth and pressure must be adjusted according to the vinyl type to achieve optimal cuts. Proper maintenance‚ such as keeping the blade sharp‚ is crucial for consistent results. A good cutter not only enhances the quality of your HTV designs but also streamlines the weeding process. By cutting designs accurately‚ it saves time and reduces material waste. For beginners‚ a basic desktop cutter is sufficient‚ while experienced crafters may opt for advanced models with additional features. Always choose a cutter that suits your project size and complexity for the best outcomes.
2.2 Weeding Tools
Weeding tools are essential for removing excess vinyl from your HTV design after cutting. These tools help create clean‚ professional-looking designs by precisely trimming unwanted areas. Common tools include weeding picks‚ scrapers‚ and tweezers. Weeding picks are ideal for intricate designs‚ allowing you to remove small vinyl fragments with precision. Scrapers are used for larger areas‚ ensuring smooth removal without damaging the design. Tweezers are perfect for fine details and tight spaces. Proper use of these tools prevents errors and ensures the vinyl adheres correctly during heat pressing. Regular cleaning and maintenance of weeding tools are crucial for optimal performance. By mastering the use of weeding tools‚ you can achieve sharp‚ accurate cuts and professional-looking HTV designs with ease. These tools are indispensable for any HTV project‚ whether for personal use or commercial production.
2.4 Heat Press
A heat press is a crucial tool for HTV placement‚ applying heat and pressure to transfer designs onto garments. It ensures proper adhesion and durability of the vinyl. Choose between clamshell‚ swing-away‚ or drawer-style presses‚ depending on your needs. Preheat the press to the vinyl manufacturer’s recommended temperature‚ typically between 280°F and 330°F. Use a temperature gun to verify accuracy. Pressure settings should be firm but not excessive to avoid damaging the garment. Place the design on the garment‚ cover it with butcher paper or a heat-resistant sheet‚ and press for 10-20 seconds. Let the garment cool before handling to ensure the vinyl sets properly. Always refer to the vinyl’s instructions for specific time and temperature requirements. A heat press is indispensable for achieving professional-grade HTV results‚ ensuring vibrant colors and long-lasting designs.
2.5 Measuring Tape
A measuring tape is an essential tool for accurate HTV placement‚ ensuring designs are correctly sized and positioned. Use it to measure garment dimensions‚ such as chest width or sleeve length‚ and align designs precisely. Measure from the neckline to determine where to place the top of the design‚ typically 3-3.5 inches below for adult shirts. For pocket placements‚ measure the pocket size to ensure the design fits perfectly. The measuring tape also helps center designs‚ ensuring symmetry and a professional finish. It’s indispensable for maintaining consistency across different garment sizes‚ from toddlers to adults. By using a measuring tape‚ you can avoid guesswork and achieve precise‚ balanced results every time. This tool simplifies the placement process‚ making it easier to create visually appealing and well-aligned designs for any project.
2.6 Alignment Grid
An alignment grid is a vital tool for ensuring precise HTV placement. It provides a visual guide with marked measurements‚ helping you center designs accurately on garments. Use it to align the top and bottom of your design with the garment’s neckline or other key landmarks. The grid is especially useful for maintaining symmetry‚ ensuring your design is straight and evenly spaced. For chest placements‚ align the grid’s center mark with the garment’s midpoint to achieve a balanced look. It also helps with sleeve and back placements by providing clear reference points. The alignment grid minimizes errors and saves time‚ making it an indispensable asset for achieving professional results. By using this tool‚ you can ensure your HTV designs are perfectly positioned every time‚ enhancing the overall quality of your projects.

Sizing Guide for HTV Designs
Proper sizing ensures designs look balanced. For adult shirts‚ aim for 9-12 inches wide. Youth designs are 7-9 inches‚ while toddler and infant designs are smaller. Use a sizing guide for accuracy.
3.1 Adult Shirt Sizing
For adult shirts‚ the ideal HTV design size typically ranges from 9 to 12 inches in width and 6 to 8 inches in height. This ensures the design is visible without overwhelming the garment. The placement should be centered on the chest‚ with the top of the design measuring 3 to 3.5 inches below the neckline. This creates a balanced and professional appearance. For larger shirts‚ such as 3XL or 4XL‚ you may need to increase the design size slightly‚ ensuring it remains proportional to the garment. Always measure the chest width to confirm sizing accuracy. Proper sizing enhances the aesthetic appeal and ensures the design looks cohesive on the wearer. By adhering to these guidelines‚ you can achieve a polished finish for your HTV projects.
3.2 Youth Shirt Sizing
Youth shirts require slightly smaller HTV designs compared to adult sizes. A standard size ranges from 6 to 8 inches in width and 4 to 6 inches in height. This ensures the design is proportionate to the garment without appearing oversized. For placement‚ the top of the design should be positioned 2 to 3 inches below the neckline‚ centered on the chest. Use the two-fingers rule as a quick reference: the design should sit about one finger width below the collar. For smaller youth sizes‚ reduce the design size accordingly‚ maintaining a balanced look. Always measure the chest width to ensure accuracy. Proper sizing and placement enhance the overall appearance‚ making the design look appropriate for younger wearers. This approach ensures a polished and visually appealing result for youth HTV projects.
3.3 Toddler and Infant Sizing
For toddler and infant shirts‚ HTV designs should be significantly smaller to fit the garment proportions. A typical size range is 4 to 5 inches in width and 3 to 4 inches in height. The placement should be 1.5 to 2 inches below the neckline‚ centered on the chest. Use the two-fingers rule: the top of the design should sit about one finger width below the collar. Designs for toddlers and infants can be slightly asymmetrical without being noticeable. Measure the chest width to ensure the design fits comfortably. Avoid oversized designs‚ as they may overwhelm the garment. Proper sizing and placement are essential for a professional look. These guidelines help create adorable and well-proportioned designs for younger wearers‚ ensuring comfort and visual appeal. Always double-check measurements to achieve the best results for toddler and infant HTV projects.
Perfect Placement Strategies
Perfect HTV placement ensures designs look professional and balanced. Focus on strategic areas like chest‚ sleeves‚ and back. Proper alignment enhances visual appeal and wearer comfort‚ making designs stand out.
4.1 Chest Placement
Chest placement is the most common and visually appealing option for HTV designs. The design should be centered and positioned 3 to 3.5 inches below the neckline for adult shirts. For larger sizes like 3XL or 4XL‚ place the design 3.5 to 4 inches below the neckline to ensure proportionality. This placement avoids the belly area‚ creating a balanced look. Align the top of the design with the center of the chest‚ ensuring it is symmetrical. Use a measuring tape or alignment grid for accuracy. For V-neck or scooped shirts‚ align the top of the design 1.5 inches below the neckline. This strategy ensures the design is comfortable and visually striking‚ making it ideal for various projects and garments.
4.2 Pocket Placement
Pocket placement is a popular choice for subtle yet stylish HTV designs. For adult shirts‚ designs should be 4×4 inches‚ while for kids‚ 3×3 inches is ideal. Align the top of the design 1.5 inches below the neckline‚ drawing lines from the neckline edges to the pocket corners for precise centering. Ensure the design is proportional to the pocket size and avoid oversized elements that may overwhelm the garment. This placement is perfect for logos or small graphics‚ adding a professional touch without being overly conspicuous. Use a measuring tape or alignment grid for accuracy‚ ensuring the design is centered and visually appealing. Proper pocket placement enhances the overall look‚ making it suitable for casual and workwear alike.
4.3 Sleeve Placement
Sleeve placement offers a unique way to add style and detail to garments. For HTV designs‚ the ideal spot is 2-3 inches above the shoulder seam‚ following the two-fingers rule. Designs should be smaller‚ typically 4-6 inches wide‚ to avoid overwhelming the sleeve. Center the design vertically and horizontally for a balanced look. For short sleeves‚ align the top of the design with the sleeve’s midpoint. On long sleeves‚ place it halfway between the shoulder and cuff. Use a measuring tape or alignment grid to ensure accuracy. This placement is great for logos‚ quotes‚ or small graphics‚ adding a subtle yet professional touch. Proper sleeve placement enhances the overall aesthetic‚ making it perfect for casual wear‚ sports apparel‚ or personalized gifts. Always test the design on the sleeve before pressing to ensure it aligns perfectly and looks visually appealing.
4.4 Back Placement
Back placement is a popular choice for bold‚ eye-catching designs. Center the design between the shoulder seams‚ aligning it with the chest placement for a cohesive look. The top of the design should be 3-5 inches below the collar for adult shirts and slightly lower for youth sizes. For larger designs‚ place the top 8-10 inches below the collar to ensure it doesn’t overwhelm the garment. Use a measuring tape or alignment grid to center the design perfectly. Symmetry is key for a professional finish. Avoid placing designs too low‚ as they may appear misaligned when worn. Back placement works well for logos‚ phrases‚ or intricate artwork‚ offering maximum visibility. Always measure and test the placement before pressing to ensure accuracy and a polished appearance. Proper back placement enhances the overall design‚ making it ideal for statement pieces or promotional items.
4.5 Hoodie Placement
Hoodie placement requires careful consideration to ensure designs look great and are visually balanced. For chest placement‚ align the top of the design 3-5 inches below the neckline‚ similar to T-shirts. Center the design between the shoulder seams for a polished look. On the back‚ place the design slightly lower‚ ensuring it’s symmetrical and proportional to the garment. For hoodies with a kangaroo pocket‚ position the design above the pocket or opt for a larger design that wraps around the pocket area. When placing designs on the sleeves‚ align them vertically with the chest design for consistency. Always measure and adjust based on the hoodie’s size and style. Proper placement ensures the design is both functional and visually appealing‚ making it ideal for casual and promotional wear. Use an alignment grid or measuring tape to achieve precise placement and a professional finish.

Design Considerations
Proportional design‚ symmetry‚ and color coordination are key to creating visually appealing HTV projects. Ensure designs align with garment type and size for a balanced‚ professional finish that enhances the final product.
5.1 Proportional Design
Proportional design is essential for a polished and professional look in HTV projects. The size of the design should complement the garment‚ ensuring it doesn’t overwhelm or appear too small. For adult shirts‚ designs typically range from 8 to 12 inches wide for the chest area‚ while youth sizes are smaller‚ around 6 to 8 inches. Toddler and infant designs should be even more scaled down‚ usually between 4 to 6 inches. Symmetry plays a crucial role‚ as it creates a balanced aesthetic. Always measure the garment before cutting the vinyl to ensure the design fits appropriately. For example‚ a design meant for the chest should align with the two-fingers rule‚ sitting 1.5 to 3 inches below the neckline. Proportional sizing ensures the final product looks cohesive and visually appealing‚ enhancing both comfort and style for the wearer.
5.2 Symmetry in Design
Symmetry in design is a key element for creating visually appealing HTV projects. A balanced layout ensures the design looks professional and attracts attention. Symmetrical designs are particularly effective for chest and back placements‚ as they naturally draw the eye to the center. To achieve symmetry‚ use alignment tools or fold the garment to mark the center point. For rounded neck shirts‚ align the top of the design 3 to 3.5 inches below the neckline. On V-necks and scooped styles‚ place the top 1.5 inches below the neckline. Pocket designs should be centered and sized appropriately‚ typically 3×3 inches for kids and 4×4 inches for adults. Symmetrical placement ensures the design looks intentional and polished‚ making it more likely to stand out and leave a lasting impression on the wearer and anyone who sees it. Always double-check alignment before pressing to ensure perfection.
5.3 Color Coordination
Color coordination is essential for creating a cohesive and visually appealing HTV design; Choosing colors that complement the garment and the design ensures a professional finish. Contrast is key to making the design stand out‚ while harmonious colors create a balanced look. For example‚ bright colors on dark garments or metallic finishes on neutral backgrounds can elevate the design. Consider the garment type and its intended use when selecting colors. Youth and toddler designs often benefit from vibrant‚ playful colors‚ while adult designs may lean toward more subdued or elegant tones. Proper color coordination enhances the overall aesthetic‚ making the design more eye-catching and professional. Always preview the design on the garment to ensure the colors work well together before pressing. This step ensures the final product looks polished and meets your creative vision. Color coordination is a simple yet impactful way to enhance your HTV projects.

Tips for Different Garment Types
Different garments require tailored HTV placement strategies. T-shirts‚ hoodies‚ and onesies each have unique considerations for design size‚ position‚ and alignment. Understanding fabric type and garment usage ensures optimal results.
6.1 Round-Neck Shirts
For round-neck shirts‚ proper HTV placement is essential for a polished look. The design should be centered and placed 3 to 3.5 inches below the neckline for adults. For youth sizes‚ reduce the distance to 2 to 2.5 inches‚ while toddler and infant shirts typically require 1.5 to 2 inches below the neckline. Use a measuring tape or alignment grid to ensure accuracy. The design should be proportional to the shirt size‚ avoiding oversized graphics that overwhelm smaller garments. For onesies‚ place the design slightly lower to accommodate the snap closures. Always consider the wearer’s body type and the garment’s intended use when positioning the HTV. This ensures a balanced‚ visually appealing result that enhances the overall aesthetic of the shirt.
6.2 V-Neck and Scooped Neck Shirts
For V-neck and scooped neck shirts‚ HTV placement requires careful alignment to complement the garment’s unique shape. The design should be centered and positioned 1.5 inches below the neckline‚ aligning with the lowest point of the V or the center of the scoop. This ensures the design looks balanced and proportional. When placing HTV on these shirts‚ consider the depth of the V or scoop to avoid overwhelming the space. For larger shirts‚ such as 3XL or 4XL‚ increase the placement distance slightly‚ up to 2 inches below the neckline. Smaller designs work best for V-necks and scooped necks‚ as they maintain a clean‚ polished appearance without overwhelming the wearer. Always measure and align carefully to ensure the design enhances the shirt’s style rather than detracting from it.
6.3 Hoodies and Sweatshirts
When working with hoodies and sweatshirts‚ HTV placement requires careful consideration due to their thicker material and unique features like hoods and pockets. For chest designs‚ position the HTV 3-4 inches below the neckline‚ ensuring it sits centered and proportional to the garment. On hoodies‚ avoid placing designs too high‚ as they may be covered when the hood is up. Instead‚ opt for a slightly lower placement‚ around 4-5 inches below the neckline‚ to ensure visibility. Pocket areas are ideal for smaller designs‚ such as logos or simple graphics‚ and should be aligned with the pocket’s edges. For full-front designs‚ ensure the HTV is large enough to cover the chest area without overwhelming the garment. Always measure and center the design to maintain a professional appearance. Proper placement enhances both the durability and visual appeal of the HTV design on hoodies and sweatshirts.
6.4 Onesies and Infant Wear
When applying HTV to onesies and infant wear‚ proper placement is essential for both functionality and aesthetics. For front designs‚ position the HTV 2-3 inches below the neckline‚ ensuring it is centered and proportional to the garment. This placement avoids interference with snaps or zippers while maintaining visibility. On the back‚ align the design 3-4 inches below the neckline‚ centered for a balanced look. Designs should be smaller in size‚ typically 4-6 inches wide for infants and slightly larger for toddlers‚ to suit the garment’s scale. Always measure carefully and consider the child’s comfort‚ avoiding bulky designs that may irritate sensitive skin. Proper placement ensures the HTV adheres well and creates a visually appealing‚ professional finish on infant wear.

Measuring Techniques
Accurate measuring is key to perfect HTV placement. Use a ruler or alignment grid to center designs. The two-fingers rule helps estimate placement height‚ ensuring a balanced look on all garments.
7.1 Using the Two-Fingers Rule
The two-fingers rule is a simple yet effective method for placing HTV designs. By measuring the distance between the neckline and the design using two fingers‚ you ensure the design sits naturally on the chest. This technique is especially useful for adult shirts‚ where the top of the design should be approximately 3-3;5 inches below the neckline. For children’s shirts‚ the measurement is slightly less‚ around 2-3 inches. This rule helps maintain a balanced and visually appealing placement‚ ensuring the design doesn’t sit too high or too low. It’s a quick and practical approach that enhances the professionalism of your HTV projects without requiring specialized tools.
7.2 Centering the Design
Centering the design is essential for a professional finish. To achieve this‚ fold the shirt lengthwise and align the shoulder seams at the neckline. This fold marks the vertical centerline. Place the design along this line‚ ensuring symmetry. For chest placements‚ the top of the design should be 3-3.5 inches below the neckline for adults and slightly less for children. Use a measuring tape to confirm the position. Proper centering ensures the design looks balanced and visually appealing. For hoodies‚ align the design with the center of the chest‚ avoiding the hoodie seam. This method works for most garment types‚ ensuring consistency and professionalism in your HTV projects. Always double-check the placement before pressing to avoid errors. Centering is a fundamental step that enhances the overall quality of your heat transfer vinyl applications.


About the author