Companion gifts in SWTOR unlock affection, influence, and perks․ Knowing each companion’s taste—military, luxury, or cultural—lets you boost relationships․ Use charts and vendor info to choose wisely․ Now
What Are Companion Gifts and Their Purpose
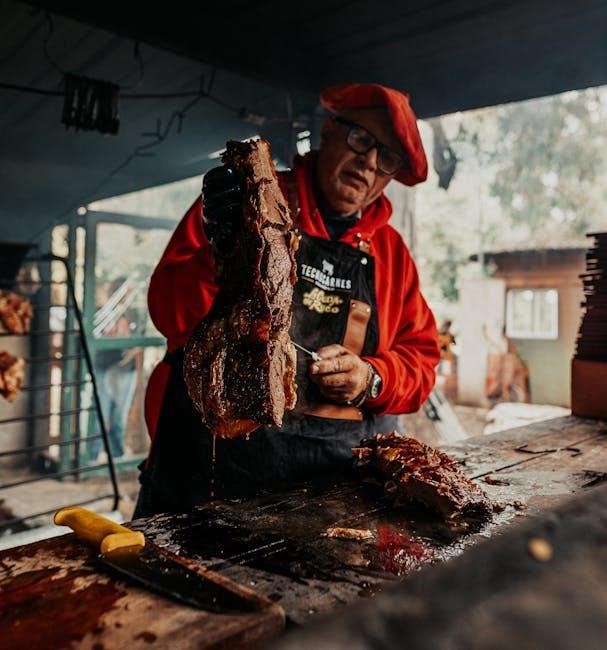
Companion gifts serve as the primary conduit for building emotional bonds with your in‑game allies․ Each gift is categorized by type—military gear, and luxury trinkets, or cultural artifacts—and carries a rank that determines its influence value․ When you present a gift, the companion’s affection rises, unlocking new dialogue options, skill bonuses, and even cosmetic upgrades․ High‑rank gifts can provide a four‑fold influence boost, but only if the companion truly loves the item; otherwise the benefit is minimal․ Because the game does not display a companion’s preference directly, players rely on community‑compiled charts that list which gifts are “loved,” “liked,” or “tolerated․” These resources are essential for efficient progression, ensuring that you spend credits on items that maximize affection gains rather than wasting them on neutral or disliked gifts․ Mastering gift choices speeds affection gains, unlocks companion perks, can tip balance in missions where influence points matter!!!!
Companion gifts fall into distinct groups: military gear, weapons, technology, luxury items, courting gifts, cultural artifacts, and faction memorabilia․ Each category appeals differently for your crew․!!!!!
Military Gear, Weapons, and Technology
Military gifts in SWTOR cater to combat‑focused companions․ High‑rank items such as advanced blasters, tactical armor, and tech upgrades can be bought from the Fleet Station vendor or earned via mission crew rewards․ These gifts grant higher influence XP than neutral ones, and when a companion truly loves the item, the multiplier can reach four times the base value․ Choose gifts that match the companion’s class and faction: Republic soldiers favor blaster rifles and light armor, while Imperial operatives prefer stealth‑modules or modified weapons․ Technology gifts—sensor upgrades, power‑cell enhancers, nano‑repair kits—are valued for their combat utility․ Consulting a fan chart confirms exact preferences, ensuring you give the right item to maximize affection and mission performance․ By focusing on the right military gear, you can steadily raise your companion’s affection while boosting your fleet’s overall effectiveness․ Finally, keep track of your gift inventory, as running out stalls your companion’s affection daily!!․

Luxury and Personal Items
Luxury gifts—robes, exotic jewelry, and artifacts—boost affection for companions who value status․ Republic favors elegant gifts; Empire prefers opulent tech․ Loved gifts give four‑fold influence XP daily!!!
Courting Gifts, Luxury Items, and Cultural Artifacts
Courting gifts—such as scented oils, fine wines, and personalized trinkets—are prized by companions who appreciate romance and personal touch․ Luxury items like designer robes, crystal jewelry, and high‑end tech gadgets signal status and wealth, appealing to those who value prestige․ Cultural artifacts—ancient relics, rare manuscripts, and ceremonial weapons—resonate with companions who cherish history and heritage․ Each companion’s preference is cataloged on fan sites; for example, a Republic assassin may love a jeweled dagger, while an Empire warrior prefers a polished trophy․ Timing matters: gifting during a companion’s birthday or after a mission can amplify the affection boost․ Use the companion gift chart to match the exact type and rank for maximum influence XP․ Love gifts grant four times the influence points of neutral gifts, and some luxury items are only obtainable from high‑tier vendors, whereas certain cultural artifacts drop from elite missions․ Avoid gifting items a companion dislikes, as it can reduce affection and waste credits․
Faction-Specific Gift Preferences
Republic companions favor honor, duty, and military gear, while Empire lovers seek power, elite weapons, and trophies․ Match faction lore for best affection․!!!
Republic vs․ Empire Gift Tastes
Republic companions value justice, honor, and collective strength․ Gifts emphasizing duty—polished military gear, tactical weapons, or items reinforcing Republic ideals—resonate deeply․ Empire lovers favor displays of power, prestige, and personal triumph․ High‑ranked weapons, exclusive trophies, and artifacts showcasing Empire dominance yield great affection․ When choosing a gift, consider the companion’s background: a former Jedi or seasoned Republic officer will appreciate gear reflecting commitment to the Republic, while a former Imperial officer or loyal Empire operative will respond best to status‑signaling items․ Cultural artifacts tied to each faction’s heritage—Republic’s historical relics or Empire’s imperial regalia—enhance the bond․ Always cross‑reference companion preferences on a fan‑made chart before purchasing, as some deviate from general faction trends․ By aligning your gift with the faction’s ethos, you maximize affection gains and unlock unique companion perks․ Gift choices shape companion paths․ Enjoy․Yo!!!

Class-Based Gift Preferences
Assassin companions favor stealth gear and covert tech․ Warriors love heavy armor and melee weapons․ Pistolists prefer precision firearms․ Other classes enjoy items matching their playstyle․ tactical gear․
Assassin, Warrior, Pistol, and Other Class Tastes
Assassin companions love covert gifts: Stealth Cloaks, Silenced Blasters, and Covert Tech Modules․ Warriors prefer heavy gear like Power Swords and Reinforced Shields․ Pistolists enjoy precision weapons such as High‑Caliber Pistols and Targeting Modules․ Engineers value Tech Enhancers and Repair Kits; Marksmen favor Long‑Range Rifles and Scope Upgrades; Support types like to use Healing Devices and Shield Generators․ Tailoring gifts to each class boosts affection and unlocks class‑specific perks․ Gift rank determines the affection boost: Rank 1 and 2 gifts are available from vendors, while higher ranks require mission crew skills․ Selecting a gift that matches a companion’s preference maximizes the affection gain and speeds up the path to unlock their unique abilities․ Choosing the rank saves credits now․
Using Love Gifts for Influence XP Boosts
Love gifts grant four‑times the influence XP of neutral gifts, making them essential for rapid progression․ Timing them after missions maximizes the bonus, especially during high‑level content․ Enjoy!
Influence XP Multipliers and Timing
Love gifts are the cornerstone of efficient influence progression․ When you present a love‑tier gift, the game awards four times the standard influence experience that a neutral gift would provide․ The bonus is applied only to the first gift redeemed in a 24‑hour period, so timing it right is essential․ Use a love gift immediately after completing a mission crew assignment or a story quest to stack the influence reward with the mission’s own XP․ If you have several companions, stagger the gifts so each one receives its maximum bonus․ Major story milestones and campaign endings also trigger temporary influence XP multipliers that can be combined with a love gift for a cumulative effect․ Remember that once a companion reaches the “love” affection tier, further gifts no longer increase influence, so use the multiplier before that threshold․ By aligning love gifts with mission completions and key story events, you can accelerate influence gains and unlock higher‑tier companion perks faster than with neutral gifts alone․ Timing love gifts during or after completing can reach the influence threshold maximizing each gift’s․!
Acquiring Gift Items
Gift items come from two main sources: vendors in Fleet Stations for low‑rank gifts, and mission crew rewards for higher ranks․ Plan purchases and mission choices to match companion preferences․ upgrade gear
Vendor Purchases vs․ Mission Crew Rewards
In SWTOR, companion gifts are divided between low‑rank items sold at Fleet Station vendors and higher‑rank gifts earned through Mission Crew skill rewards․ Vendors provide Rank 1 and Rank 2 gifts, which are inexpensive and can be bought with credits or the in‑game currency․ These items are ideal for early‑game affection boosts or for companions who favor basic military gear, weapons, or simple luxury trinkets․ However, as you progress, the cost of high‑rank gifts rises sharply, and most of them are no longer available from vendors․ Instead, players must rely on Mission Crew rewards, which are tied to the skill level of the crew member assigned to the mission․ By assigning a crew with a high Mission Crew skill and completing missions that grant the desired gift rank, you can acquire the more valuable gifts that yield greater influence and affection․ This system encourages players to diversify their crew roster and strategically plan missions to match companion preferences, ensuring efficient use of time and resources․!

Consulting Companion Gift Charts
Use fan sites like swtorista․com/gifts to view each companion’s love, favorite, and tolerated gift categories․ Charts help target high‑affection gifts quickly․
Using Swtorista․com and Other Fan Resources
Swtorista․com offers a comprehensive companion gift database, listing each character’s love, favorite, and tolerated gift categories․ By entering a companion’s name, you instantly see which items maximize affection and influence․ The site also displays rank thresholds for each gift, helping you decide whether to buy a low‑tier vendor item or invest in a high‑rank crew reward․ In addition to Swtorista, community forums on SWG Forums, the SWTOR subreddit, and Discord channels host user‑generated charts that reflect recent patches․ Many players share screenshots of their personal gift stashes, revealing optimal combinations for specific classes․ Combining these resources ensures you never waste credits on a disliked gift and keeps your companion progression on track․
These resources also provide gift‑ranking tables and update logs, so you can track when a companion’s favorite changes after a patch․ By staying you avoid buying gifts and keep affection growth steady․

Best Gifts for Top-Influence Companions
Top‑influence companions thrive on high‑rank gifts that double influence XP․ Prioritize military gear, luxury items, or faction memorabilia, depending on class․ Use vendor or crew rewards wisely․ for max love!!
Gift Recommendations for Most Loved Companions
When a companion reaches the “most loved” tier, the influence multiplier skyrockets․ The optimal strategy is to pair high‑rank gifts with the companion’s favorite category․ For example, a Republic soldier who loves military gear should receive the Rank 5 “Advanced Tactical Pack” or the “Elite Combat Kit․” The cultural aficionado prefers artifacts; a Rank 5 “Ancient Sith Relic” or “Jedi Meditation Stone” yields the highest affection․ Luxury lovers benefit from the “Imperial Luxury Set” or the “Republic Luxury Suite․” Verify the gift’s rank on swtorista․com/gifts to match the companion’s love list․ If companion loves tech, “Advanced Droid Core” or “High‑End Weapon System” delivers influence․ Remember love gifts quadruple influence XP much․ Keep a balanced inventory of Rank 4/5 gifts for eachfav category! This targeted approach guarantees that your top‑influence companions stay at peak affection, unlocking exclusive perks and storylines faster than generic gifting for ultra growth․!
Gift Management and Inventory Tips
Organize gifts by rank and companion preference․ Keep a slot for each favorite category, rotate high‑rank items, and track unused gifts․ Use filters for siting! Store extras in the bank! for upgrades․
Organizing Your Gift Stash for Efficiency
Start by sorting gifts into tiers: Rank 1, Rank 2, and higher․ Use a dedicated slot for each companion’s favorite category—military, luxury, or cultural—to avoid mixing․ Keep a “quick‑access” row for the top three gifts you plan to use in the next mission․ Store surplus high‑rank items in the bank and label them with companion names and gift type․ When you acquire a new gift, immediately place it in the correct slot; this prevents accidental loss during inventory scrolling․ Use the “search” function to locate specific gifts by name or rank, and set up a filter that shows only un‑used items․ Finally, regularly audit your stash: remove duplicates, re‑rank items that have become obsolete, and replace expired gifts with fresh ones․ This systematic approach maximizes influence gains and saves time during missions․Remember to rotate gifts to keep companions excited, and double‑check the gift list before heading into a new mission to maximize your influence gains․!!!

Common Mistakes to Avoid with Gifts
Don’t buy generic gifts; they waste credits․ Avoid low‑rank gifts when high‑rank is needed․ Never ignore charts—mis‑matches reduce influence dramatically․!!
Choosing the Wrong Gift Type or Rank
When gifting a companion, selecting an inappropriate type or rank can lead to wasted credits and missed affection gains․ High‑rank gifts are often the most efficient way to boost influence, yet many players mistakenly purchase low‑rank items because they are cheaper or more readily available․ This not only squanders valuable currency but also limits the potential influence multiplier that a higher rank would provide․ Conversely, gifting a high‑tier item to a companion who tolerates low‑tier gifts yields little affection, wasting the item’s value and influence multiplier temporarily ․ The key is to consult a reliable companion gift chart—such as the comprehensive list available at swtorista․com/gifts—to determine each companion’s preferred categories and the rank that maximizes their affection response․ Additionally, be mindful of the rank: a rank‑1 gift is cheap but offers a small influence boost, whereas a rank‑4 gift can quadruple influence points if the companion loves it․ Pay attention to the “love” and “like” categories, as these indicate the gifts that will yield the highest affection returns․ By aligning the gift type and rank with the companion’s preferences, players can avoid unnecessary spending, accelerate affection progression, and unlock the full range of companion benefits․ for clarity

FAQ on Companion Gifts
What gifts give the most influence? High‑rank items love gifts yield 4× influence․ Can I gift multiple items? Yes, but only one gift per day counts for affection․ Use charts to match preferences․ Gift wisely to maximize affection․!!!??
Answers to Frequent Questions about Gifts and Affection
Here are concise answers to common queries about companion gifts in SWTOR․ What determines a gift’s influence bonus? High‑rank gifts (rank 3–5) grant 4× influence when used as a love gift, while rank 1–2 gifts provide standard influence․ How many gifts can I give per day? You may give one gift per companion per day; gifts that day are ignored for affection․ Can I use vendor‑purchased gifts for all ranks? Only rank 1 and 2 gifts are vendor‑available; ranks 3–5 must be earned Mission Crew skills․ Do gifts affect companion skill progression? No, gifts raise affection and influence, not skill points․ Is there a way to see a companion’s favorite gift type? Consult fan charts (e․g․, swtorista․com/gifts) to view each companion’s love, or tolerate categories․ What happens if I give a disliked gift? The companion’s affection drops, lowering influence gains․ Can I trade gifts with other players? Gifts must be purchased or earned by the giver․ Remember to track gift usage daily for results․ Gift wisely to strengthen bonds․ Usage for best results․ Now․ Use․ !!!!!!!!!!!!!!!!!!!!!!!